- Why Brand Hardware at All
- Branding Methods Compared
- Branding Zipper Pulls and Sliders
- Branding Buckles and Clasps
- Rivets, Snaps and Studs
- Metal Logo Plates and Tags
- Design Rules for Small Logos
- Tooling, MOQ and Lead Time
- What Custom Hardware Costs
- Proofing and Approval
- Quality Control on Branded Hardware
- Protecting Your Design
- FAQ
Why Brand Hardware at All
A logo on a buckle or a zipper pull is the smallest piece of branding a bag carries and one of the most durable. It survives the material, the lining and the trend cycle, and it travels with the customer every day.
The most durable brand surface on a bag
Leather scratches, prints fade and labels are cut out by customers who find them irritating. Metal and molded hardware stay legible for the life of the bag and beyond, which makes it the most persistent place a brand can sign its product.
That permanence cuts both ways: hardware branding is also the most costly brand element to change, requiring tooling and new stock. The mark you choose should be one you can live with for several seasons.
What branded hardware does for perceived value
A custom pull or engraved clasp signals that the product was made for a specific brand rather than assembled from a catalogue. Customers read custom hardware as a sign of investment and, fairly or not, as evidence of quality.
For wholesale buyers the signal is commercial: distinctive hardware helps a bag hold its price in a crowded market and gives retailers a reason to reorder from you rather than a generic supplier.
Brand recognition at arm’s length
A repeated hardware mark trains recognition. Regular customers begin to identify a bag by its clasp or pull before they see any label, which builds the kind of familiarity that supports repeat purchase and word of mouth.
The effect requires consistency. One mark, one finish language and one position across the line — a brand that changes its hardware identity every season spends its recognition budget starting over.
Branding Methods Compared
Hardware can carry a logo in several ways, and the method determines the look, the durability, the tooling cost and the minimum order. Choosing the method is the first real decision.
Engraving and laser etching
Engraving cuts the mark into the metal, producing a recessed logo that survives wear and feels tactile. Laser etching does a similar job with finer detail and lower setup, which makes it suitable for small runs and fine line work.
Both suit metal parts and both wear well; the difference is depth, contrast and cost. Engraved marks read more solid in the hand, while laser etching reproduces intricate logos that engraving tools cannot follow.
Debossing, stamping and raised marks
Stamping and debossing press the logo into the metal or mold the part with a raised design. Raised marks on molded plastic and die-cast hardware cost nothing extra per piece once the mold carries the design — the cheapest permanent branding available at volume.
The trade-off is the mold cost and the wait. A raised logo means a custom mold, which raises the minimum order and the lead time but delivers identity at negligible per-unit cost.
Enamel, paint and plating accents
Recessed logos can be filled with enamel or paint to add color contrast, producing a crisp, brand-colored mark. Plating can also be applied selectively so that the logo appears in a different finish from the surrounding metal.
Filled marks look premium and photograph beautifully, but the fill can wear at high-contact edges. Reserve them for parts that are seen more than gripped, or accept the wear as part of the product’s aging.
| Method | Look | Durability | Tooling | Best for |
|---|---|---|---|---|
| Engraving | Recessed, tactile | Excellent | Medium | Metal buckles, plates |
| Laser etching | Fine, low contrast | Very good | Low | Small runs, fine detail |
| Raised mold mark | Bold, integrated | Excellent | High (mold) | Plastic and cast parts |
| Enamel fill | Colored, premium | Good | Medium | Logo plates, clasps |
| Printed / pad print | Flat, colorful | Moderate | Low | Low-contact areas |
Choosing by contact and volume
The method follows two variables: how much the part is touched and how many you order. High-contact parts need engraving or molding; low-contact parts can carry printed or filled marks.
Volume decides the rest. At large volumes a custom mold is the cheapest branding per piece; at small volumes laser etching or an off-the-shelf part with a printed logo is the only economical route.
Branding Zipper Pulls and Sliders
The zipper pull is the most-used component on most bags and therefore the highest-visibility branding position available. It is also the part customers touch hundreds of times, which raises the bar for durability.
The pull as a miniature logo plate
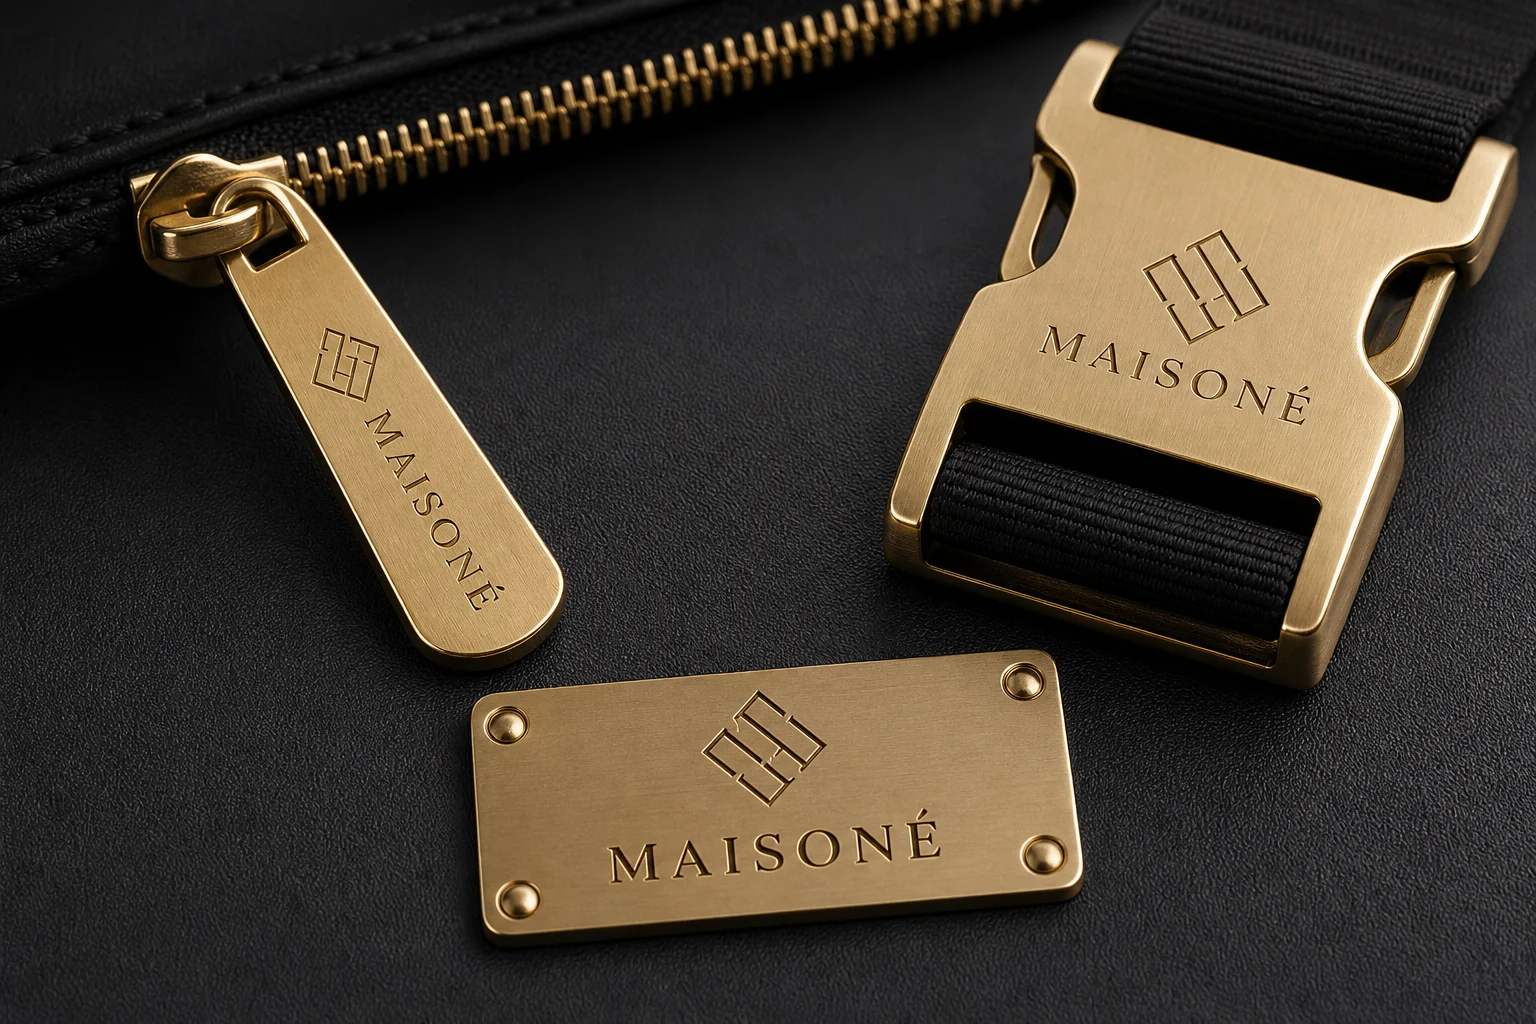
Custom pulls turn the zipper into a branded touch point: a shaped metal pull carrying the logo, a leather tab with a debossed mark, or a cord pull with a branded metal end. Each design changes the grip and the statement.
Metal pulls with an engraved or stamped logo give the clearest branding and the best durability. Leather pulls with a debossed mark suit natural materials and add warmth, though the mark softens with use.
Custom versus off-the-shelf pulls
Branding a standard pull means less tooling and a lower minimum order; a fully custom pull shape costs a mold but delivers a proprietary silhouette that no competitor can copy from a catalogue.
The practical route for most brands is a standard zipper body with a custom pull — the zipper keeps its certified performance while the visible pull carries the identity. This combination delivers 80% of the branding value at a fraction of the tooling cost.
Sliders, stops and marking positions
Some brands also mark the slider body, which is visible when the zipper is open, or specify a branded pull tab attached to the slider ring. Both add a mark without changing the zipper’s mechanical specification.
Whatever the position, check the mark on the assembled bag with the zipper open and closed. A logo that is hidden in the closed position or awkward upside-down when open is a branding decision made on a flat drawing rather than on the product.
Branding Buckles and Clasps
Buckles and clasps sit at the visual center of many bag designs and carry enough surface area for a readable mark. They are the natural home for a brand’s logo on a bag with a prominent closure.
Die-cast logos on buckles
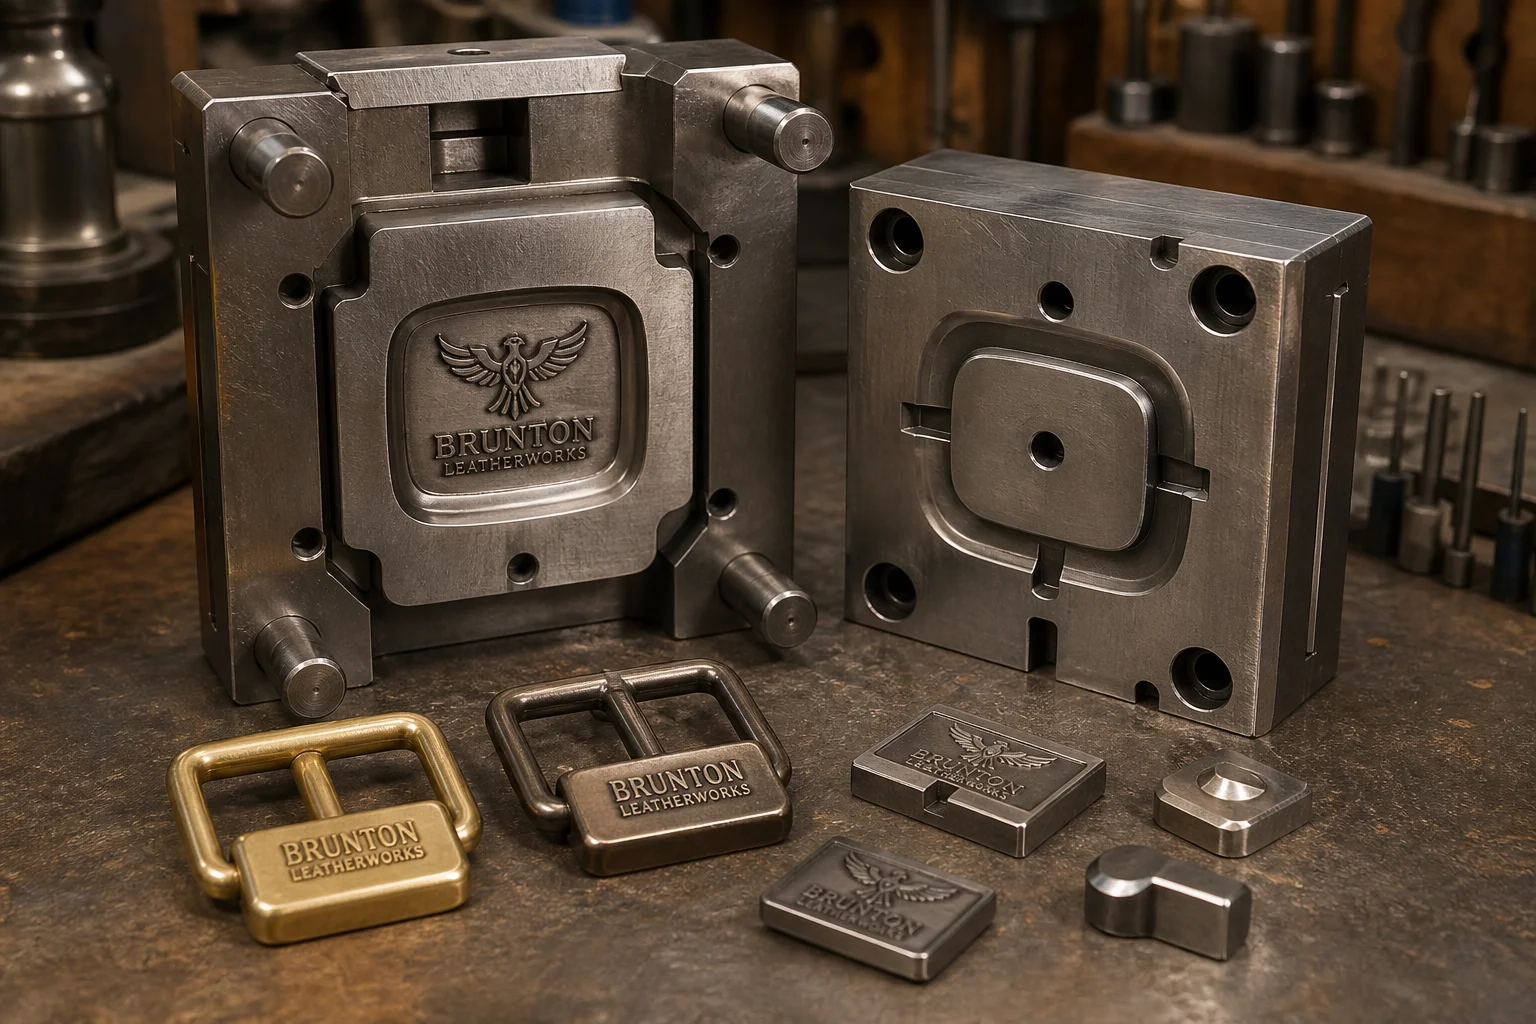
Die-cast buckles can carry a raised or recessed logo as part of the mold, giving a permanent, integral mark with no per-piece cost. The mold is the investment; after that, every buckle arrives branded.
The design must respect casting limits: very thin lines and tight corners do not fill reliably, so the artwork needs to be adapted for the process. A logo designed for print rarely survives into a mold unchanged.
Engraved and laser-marked clasps
Engraving suits metal clasps where the mark should be visible but understated, and laser marking handles fine detail on both metal and some plastics. Both can be applied to standard parts, which lowers the minimum order compared with a custom mold.
Contrast is the design challenge on engraved metal: a fine line in the same color as the base metal is nearly invisible. Filling the engraving with enamel or a contrasting plating solves the problem at a modest cost.
Where the mark belongs on a buckle
On a side-release buckle the natural position is the center bar or the front face the thumb meets. On a clasp or turn-lock the center of the rotating element or the plate beneath it reads best.
Check the mark in the closed position, since that is how the bag is seen most of the time. Many branding decisions are approved on the open sample and look wrong on the shelf.
Rivets, Snaps and Studs
Small metal parts offer repeating branding opportunities: a marked rivet at each strap anchor creates a rhythm of logos across the bag without a single large piece of hardware.
Branded rivets and studs
Rivets and studs can carry a debossed or stamped mark on the dome, giving the bag an unintended-level detail that buyers notice on close inspection. The mark is small, so it should be a simplified symbol rather than a full wordmark.
Repeating the mark at several anchor points creates a coherent hardware language. Consistency across rivets, buckles and pulls makes the bag feel designed rather than assembled.
Snap fasteners and their branding limits
Snap fasteners offer less surface area and their mechanisms limit how much of the face can be marked. A debossed ring logo or a small central mark is realistic; a detailed logo is not.
Where a snap is the only visible metal on a design, pairing a small marked snap with a branded leather tab nearby restores the branding without fighting the fastener’s mechanics.
Feet, rings and other small parts
Bag feet, D-rings and O-rings can also carry marks, usually as a small debossed symbol on the flat face. At this scale the mark functions as a signature for the customer who looks closely rather than as a primary brand signal.
Prioritise: spend the branding budget on the pull and the main closure first, then extend to the repeating small parts if the tooling cost is justified by the volumes.
Metal Logo Plates and Tags
A metal logo plate is the most direct hardware branding method: a dedicated piece of metal that carries the brand and nothing else. It is the option that most resembles traditional jewellery-box branding.
Plate styles and attachment
Plates attach by riveting, screwing, stitching through eyelets or being set into a recess in the material. Riveted and screwed plates are permanent and repairable; stitched plates suit soft materials and can be removed without damaging the metal.
The attachment method determines the failure mode: a screw can loosen, a rivet can be pulled through weak material and a stitched plate relies on the thread. Choose the attachment to match the material and the load the area sees.
Materials and finishes for plates
Plates are usually zinc alloy or brass, finished in the brand’s standard plating so they harmonise with the other hardware. Some brands use etched stainless steel for a modern look or a leather-backed plate for warmth.
Whatever the material, the plate’s finish should come from the same plating supplier and standard as the rest of the hardware. Finish drift between plate and buckle is one of the most visible quality defects on a production run.
Interior versus exterior plates
An interior plate near the opening can carry more information — the brand name, the city, the series — because it is read once by an interested customer rather than seen in passing. Exterior plates stay minimal.
Some brands also place a serial or edition number on an interior plate, which supports authenticity and after-sales service. It costs nothing extra on an existing plate and adds a traceable record.
Design Rules for Small Logos
Hardware branding fails more often in the artwork than in the process. Small metal surfaces demand simplified, high-contrast marks, and a logo designed for a website rarely works unchanged on a 12mm buckle.
Simplify for the surface
Reduce the mark to its essentials: a symbol, a monogram or the initials of the brand. Fine text, gradients and thin hairlines disappear at hardware scale, and a detailed wordmark becomes an unreadable smudge.
Test the artwork at actual size on a printed mock before committing to a mold. Viewing the logo at 12mm, not on a monitor, is the fastest way to discover that the design needs simplifying.
Line weight, depth and contrast
Give every line enough weight to survive the process: molded and cast marks need thickness to fill, and engraved marks need depth to read. Minimum line width depends on the method, so ask the factory for its process limits before finalising artwork.
Contrast decides legibility more than size does. A recessed mark on a polished surface reads by shadow; on a brushed surface it needs more depth or a fill. Specify the finish and the mark together, never separately.
Placement consistency across the line
Decide where the mark sits on each part type and keep it there across the range. Consistent placement is what turns separate branded parts into a recognisable hardware identity.
Document the placement in the tech pack with photographs of the approved sample, so a new order or a new factory reproduces the same position rather than making its own interpretation.
Tooling, MOQ and Lead Time
Custom hardware is a tooling decision before it is a branding decision. Understanding the mold cost, the minimum order and the timeline lets you plan a launch realistically rather than discovering the constraint late.
How tooling works for cast metals
A die-cast part begins with a mold cut from the approved artwork. The mold cost is a one-time investment that makes the branded part possible, and it stays with the supplier, which means the part is effectively tied to that supplier unless the mold is transferred.
Mold life is usually long — hundreds of thousands of cycles — so the cost amortises well over a successful product. Confirm the mold’s ownership and location in writing before paying, and ask what happens if you move suppliers.
Mold costs, minimums and how they interact
| Branding approach | Tooling | Typical MOQ | Per-piece cost |
|---|---|---|---|
| Off-the-shelf part + laser etching | None / minimal | Low | Low |
| Standard pull + engraved logo | Low (fixture) | Low-mid | Low-mid |
| Custom pull or clasp mold | High | Mid-high | Low at volume |
| Enamel-filled logo plate | Mid | Mid | Mid |
| Full custom hardware program | High | High | Lowest at scale |
The pattern is consistent: tooling buys down the per-piece cost. The right row depends on your volume forecast, and the common mistake is choosing a custom mold for a product that will never reach the volume to justify it.
Lead time from artwork to production
Allow time for artwork adaptation, mold cutting, first samples, revision and approval before production. A custom hardware program can add several weeks to a launch, and the hardware timeline often becomes the critical path.
Start hardware development early — in parallel with material and pattern work rather than after them — so the branded parts are approved by the time the bag sample is assembled.
What Custom Hardware Costs
Hardware branding budgets are small in absolute terms but visible in the bill of materials. Understanding where the money goes keeps the decision commercial rather than aspirational.
The three cost components
Custom hardware costs divide into tooling, the per-piece hardware cost and the branding operation. Tooling is one-time; the other two scale with volume. The mix determines whether a program is worth doing.
A branding operation such as laser etching adds a small per-piece charge but no mold cost, which makes it the natural starting point for a brand testing its first custom hardware.
Amortising tooling across volume
Divide the mold cost by the planned volume to see the real per-piece premium. A mold costing a few thousand dollars across 10,000 units adds a modest amount per bag; the same mold across 500 units does not make sense.
Run this arithmetic before committing, and revisit it when the volume forecast changes. Tooling that looked unaffordable at 1,000 units often becomes trivial at 20,000.
Where the money is best spent
Spend first on the part the customer touches most — the zipper pull and the main closure — where branding and quality perception overlap. Then extend to the repeating small parts if the volume justifies the tooling.
Resist spreading custom tooling across many parts in the first season. One excellent branded pull usually builds more identity than five mediocre branded parts at the same budget.
Proofing and Approval
Branded hardware must be approved on physical samples, not drawings. The gap between a rendered logo and a cast mark is where most disappointment is created and, fortunately, most is preventable.
From artwork to first sample
Supply vector artwork with clear line weights and the intended finish. The factory adapts it to the process, and the result is a first sample sometimes called a strike-off or mold trial, which shows how the mark actually renders in metal or plastic.
Expect the first sample to need revision: thin lines may disappear, shallow engraving may lack contrast and the mark may sit differently on a curved surface than on the flat drawing.
What to check on the hardware sample
Inspect the mark at actual size and distance, in daylight, with the part mounted on the bag. Check legibility, alignment, depth, finish consistency with the other hardware, and how the mark reads in the closed as well as the open position.
Then test it: run the zipper or operate the buckle repeatedly and inspect the mark for wear. A branding detail that disappears after a hundred cycles is not a branding detail at all.
Approving and referencing
Approve the sample in writing with photographs and keep a sealed reference for production. Record the finish, the weight and the mark’s position so the reference can be enforced later.
Quality Control on Branded Hardware
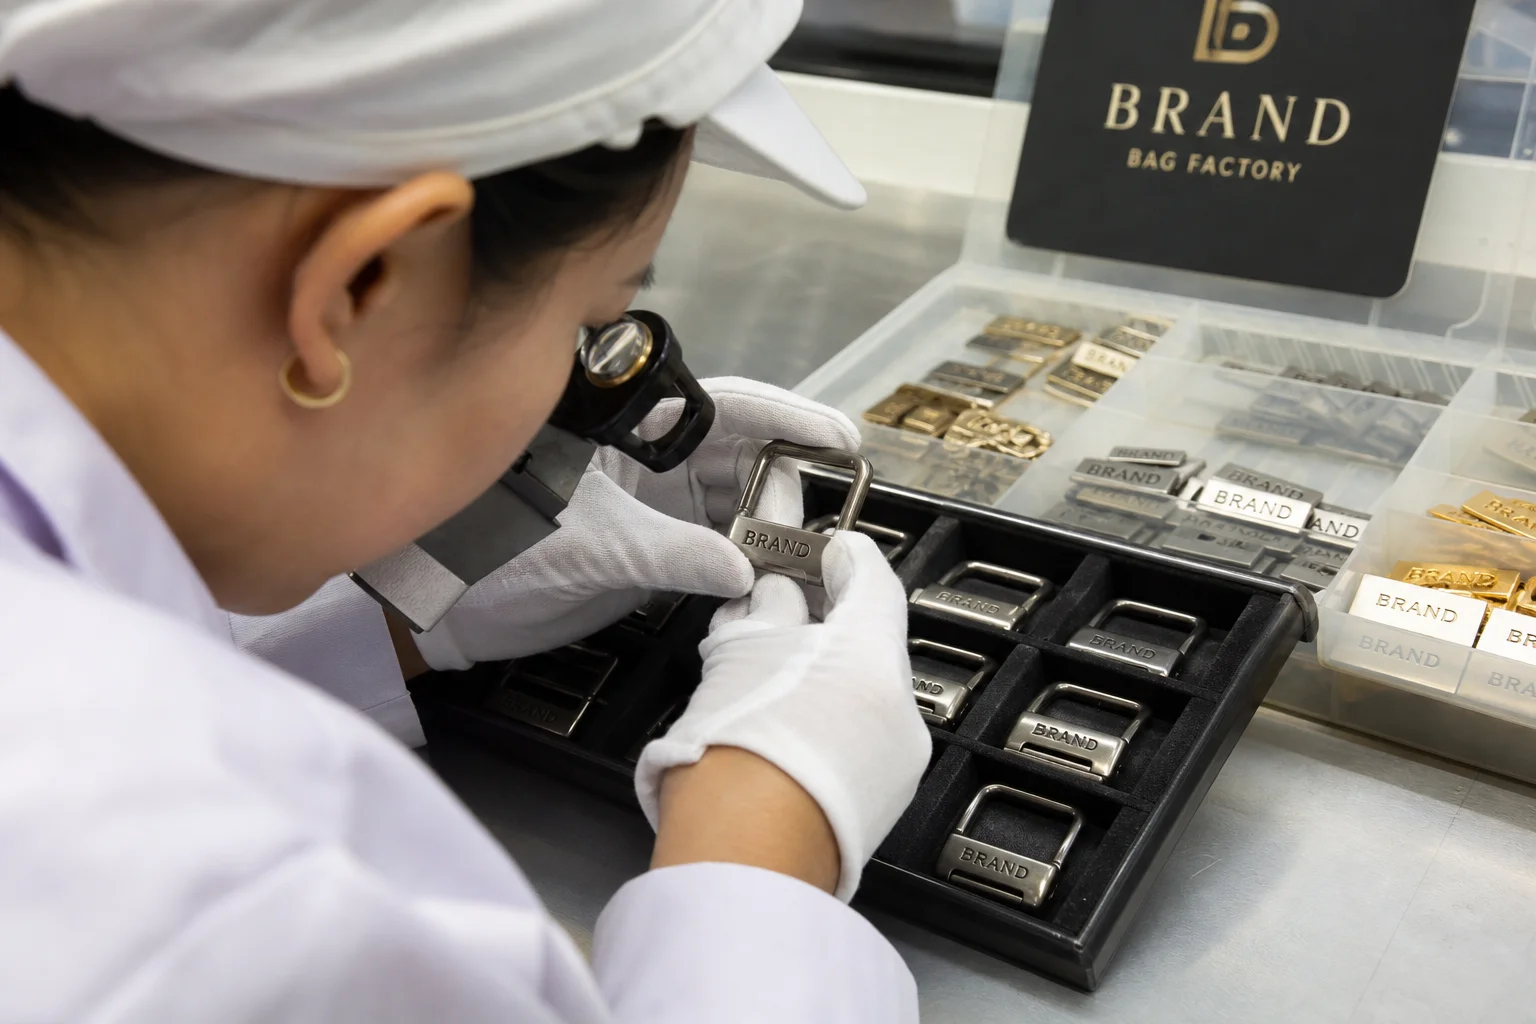
Branded hardware introduces quality variables that plain hardware does not have: mark legibility, finish consistency between parts, and the alignment of the mark with the bag. Each needs its own check.
Incoming inspection of branded parts
Check incoming hardware against the sealed reference: the mark’s depth and sharpness, the plating colour against the other parts, the dimensions and the weight. Reject parts where the mark is shallow, blurred or misaligned.
Sample the batch rather than inspecting every piece, using a standard sampling plan, and record the results. A written record of rejected lots is the evidence that keeps a supplier careful.
Finish consistency across parts
Plating batches can drift in tone, so compare the pull, the buckle, the rivets and the plate side by side under the same light. A visible difference between two parts on the same bag is a defect customers notice immediately.
The fix is ordering all hardware for a style from the same plating batch and specifying a tolerance for colour variation. Where the batch must change, approve the new tone against the old before production.
Mark alignment on the assembled bag
Check that the mark sits where the tech pack says it should — centred on the buckle, upright on the pull, level on the plate. Alignment errors are invisible in a loose-parts inspection and obvious on the finished bag.
Add the mark’s position and orientation to the inspection checklist for the assembled product, and photograph the approved position for the inspector’s reference.
Protecting Your Design
Custom hardware exists to differentiate your product, which makes the design worth protecting. Without basic precautions, a mold paid for by one brand can end up branding a competitor’s bag.
Ownership of molds and artwork
State in writing who owns the mold and where it is stored, and require written consent before it is used for any other order. Confirm that the artwork and the mold cannot be reused for third parties.
Where the budget allows, keep a copy of the mold specification and consider owning the physical mold. The cost of a second mold is small compared with the cost of losing your distinctive hardware.
Exclusivity agreements and enforcement
Ask for an exclusivity commitment on custom hardware designs and put it in the production agreement rather than a side conversation. Define the term, the territory and what happens at the end.
Practical enforcement matters more than legal language: monitor the market, and treat an unexplained look-alike product as a supply chain question before a legal one. A factory that respects the agreement is a better partner than a lawsuit.
Designing around copyability
The deeper defence is a mark that is hard to copy well: a proprietary shape, a distinctive finish combination or a mark that requires tooling a copier would have to invest in. Complexity raises the cost of imitation.
Combine a protected design with a strong brand presence — the hardware mark, the tags, the packaging — so that a copy is recognisable as a copy. Authenticity is easier to defend when the original is unmistakable.
Branded hardware is a small investment in a big promise: a mark the customer touches every day. Choose the method by contact and volume, prove it on a physical sample, and protect the tooling that makes it yours.
FAQ
Which part of a bag is best for custom hardware branding?
The zipper pull is the highest-value position — it is the most-touched component and therefore the most-seen brand surface. The main closure comes second, followed by repeating small parts such as rivets and studs.
What is the cheapest way to brand bag hardware?
Laser etching or engraving on a standard part avoids mold cost and low MOQs make it accessible, while raised mold marks are cheapest per piece at high volume. Choose by your forecast: low volume favours etching, high volume favours a mold.
How long does custom hardware take from artwork to production?
Expect several weeks for artwork adaptation, mold cutting, first samples and revision before production. Treat hardware as a parallel workstream from the start, because it often becomes the critical path in a launch.
Do I own the mold if I pay for it?
Only if the agreement says so. Put mold ownership, storage location and permitted use in writing before payment, and confirm that the mold cannot be used for other customers without your consent.
Why does my logo look blurred on the finished buckle?
Usually the artwork was not adapted to the process — fine lines and tight corners do not fill or cut cleanly at hardware scale. Simplify the mark, thicken the lines and confirm the process limits before re-cutting the tool.
Should I brand every piece of hardware on my bag?
No — concentrate the budget on the parts the customer touches most. One strong branded pull and a branded closure create more identity than many small marks, and they are cheaper to tool.
Can I use my normal logo file for hardware?
No — supply vector artwork and expect the factory to adapt it. Small metal surfaces need simplified shapes, heavier lines and a finish chosen for contrast, and the design must be tested at actual size.
How do I check finish consistency between hardware parts?
Compare every part of the style side by side under the same light before production and after each delivery. Order a single plating batch where possible and specify a colour tolerance for the batch.
Is hardware branding worth it for a small brand?
Yes, if it is scoped to volume: a branded pull with laser etching delivers visible identity at low MOQ, and custom molds can follow once volume justifies them. Start with the part customers touch most.
What should be in the hardware branding tech pack?
The artwork with process limits, the material and finish, the mark’s position and orientation, the tooling ownership, the approved sample photographs and the inspection criteria for the mark’s depth, alignment and finish.
Next Steps: Build a Hardware Identity
Hardware branding rewards planning: choose the method by contact and volume, simplify the artwork for the surface, prove it on a physical sample, then protect the tooling and enforce the mark through inspection. Done once properly, the identity carries across every style in the range.
A factory that develops custom hardware in-house and documents the tooling and finishes makes this process straightforward. That is the standard our factory works to — ask us how we take a logo from artwork to approved hardware on every order, from first sample to final inspection.
Planning custom hardware for your bag line? Contact our team at info@gionar.com for tooling, sampling and branding support.
Related reading: our custom bag manufacturing portfolio shows how branded hardware, materials and construction come together in production.