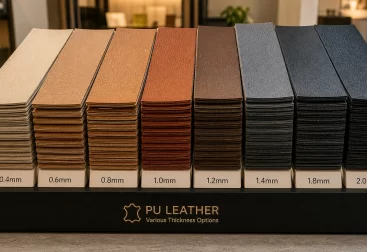
- Why the Simplest Bag Is the Hardest to Get Right
- Tote Anatomy: Panels and Components
- Cutting and Material Yield
- Handle Attachment: The Critical Detail
- Stiffening and Structure
- Closures, Pockets and Interior
- Edge Finishing and Topstitching
- Base and Corner Reinforcement
- Common Defects and Quality Control
- Cost Drivers and Yield
- Retail Presentation and Packing
- FAQ
Why the Simplest Bag Is the Hardest to Get Right
A tote looks like the easiest bag to make, and that impression is exactly why so many totes are disappointing. With no complex pattern and few components, there is nowhere for a maker to hide.
No structure to conceal a fault
A structured backpack or a briefcase can absorb small inconsistencies in panels, stitching and alignment. A tote cannot, because its large flat surfaces and open top make every deviation visible.
A wavy top edge, a handle set a few millimetres off centre or a lining that does not sit flat will be seen immediately by the customer, because the tote presents those surfaces directly.
What “simple” really means in production
The tote has fewer parts but larger ones. Large panels cost more to cut accurately, show material defects on a bigger area and demand more consistent handling at every stage.
Its handle is also its only structural feature. Where a backpack distributes load across a harness, a tote puts the entire load through two anchors — which makes those two anchors the most important centimetres of the product.
Where totes go wrong
| Issue | Root cause | Visible to customer |
|---|---|---|
| Handle pulls away from the body | Weak anchor, no reinforcement | Immediately |
| Sagging base | No base board or stiffener | When loaded |
| Top edge waves or twists | Cutting or sewing drift | Immediately |
| Lining shows through or bags | Lining cut too large, poor fit | Immediately |
| Corners wear through | No corner reinforcement | After weeks |
| Sides collapse inward | Insufficient interlining | When empty |
| Handle edges crack | Raw or unfinished edges | After use |
| Stitching wavering on the top edge | No guide, inconsistent handling | Immediately |
Each of these has a defined remedy, and most of them cost very little when they are designed in rather than corrected later. The rest of this article walks through where those decisions are made.
Why brands return to totes
Totes offer a large printable surface, an adaptable silhouette and a construction that suits a wide range of materials, from PU leather to coated canvas and heavy cotton.
That combination makes them a dependable volume product: inexpensive to produce at scale, easy to brand and usable as corporate gifting, retail carry and promotional merchandise. The commercial case is strong, which is exactly why the details deserve attention.
Tote Anatomy: Panels and Components
Before discussing construction it helps to name the parts. A standard open tote has fewer than a dozen components, and each one carries a specific function.
The panel set
A basic tote is built from a front panel, a back panel, two side panels and a base panel. Many designs simplify this by using a single gusset piece that forms the sides and base in one continuous strip.
The gusset approach reduces seams and labour, and it produces a cleaner interior. Its trade-off is that a single large piece must be cut accurately, because any distortion appears on three faces at once.
Handles and reinforcement
Handles may be cut from the same material as the body, or from webbing, leather or a contrasting material. The handle is usually a flat strip folded and stitched, or a rolled construction for a softer grip.
Behind each handle anchor there is normally an internal reinforcement — a patch of interlining, a piece of webbing or a stiffener — that spreads the load into the body rather than concentrating it at the stitch line.
The full component list
| Component | Function | Typical material |
|---|---|---|
| Front and back panels | Body faces | PU leather, coated canvas, cotton |
| Side panels or gusset | Width and depth | Same as body |
| Base panel | Load bearing surface | Body material plus reinforcement |
| Handles | Carrying | Body material, webbing, leather |
| Handle reinforcement | Load spread | Interlining, webbing patch |
| Interlining or stiffener | Shape retention | Non-woven, foam, board |
| Lining | Interior finish | Polyester, nylon, cotton |
| Interior pocket | Organisation | Lining material |
| Closure | Security | Zip, magnetic snap, none |
| Feet or base studs | Base protection | Metal or plastic |
| Labels and branding | Identity | Woven label, metal plate |
An open tote with a lining, one interior pocket and a reinforced base contains roughly nine to eleven components before branding. Each additional feature adds components and steps rather than complexity of form.
How component count drives cost
Every component requires cutting, preparation and a sewing operation. The step from an unlined tote to a lined one adds a lining assembly, a turning operation and an edge finish, which is a meaningful share of the total labour.
Adding a zip closure adds further steps: zip preparation, panel construction and a closure opening that must align precisely. These are the decisions that move a tote from one price band to the next.
Simplified versus full construction
| Construction | Components | Labour level | Perceived quality |
|---|---|---|---|
| Unlined, two panels and gusset | 5–6 | Low | Basic, promotional |
| Unlined with base reinforcement | 7 | Low–medium | Practical |
| Lined, interior pocket | 9–10 | Medium | Retail-ready |
| Lined with zip closure | 11–12 | Medium–high | Everyday use |
| Lined, structured, feet, hardware | 13+ | High | Premium |
The labour column is the one that matters for quoting. A tote’s price is driven less by material area than by how many operations the design requires.
Cutting and Material Yield
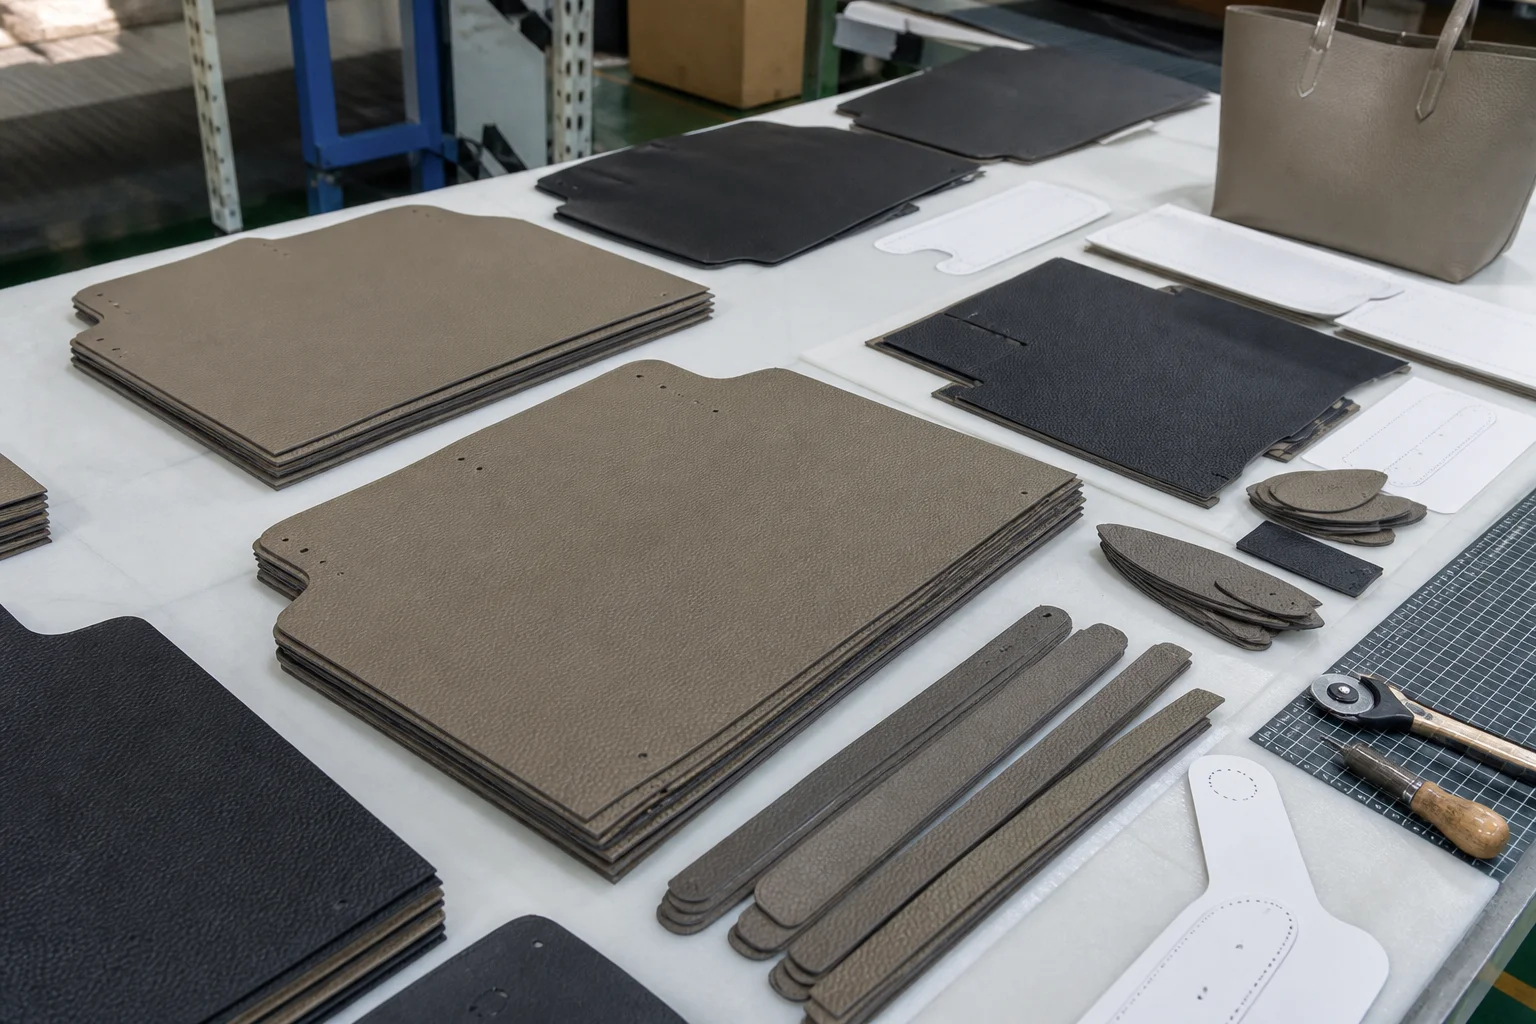
Cutting is where a tote’s cost and consistency are largely decided, because large rectangular panels leave little room for error.
Why yield matters more on a tote
A tote’s panels are close to rectangular and sized generously, so the amount of material used per bag is high relative to the finished product. Small changes in panel size therefore have a direct effect on cost.
The area of material consumed per unit is called yield, and it is worth asking about directly. Reducing a tote’s height by two centimetres can reduce material consumption noticeably across a large order.
Grain direction and appearance
PU leather and coated materials have a direction: the surface reflects light differently depending on orientation, and some materials have a visible grain that runs one way. All panels must be cut in the same direction.
If one panel is cut against the direction, the finished bag shows a colour shift between faces under certain lighting. It is a subtle fault that looks like a material defect and is entirely preventable.
Cutting practice that prevents problems
| Practice | Effect |
|---|---|
| Single direction for all panels | Consistent appearance under light |
| Nesting patterns to reduce waste | Better yield, lower material cost |
| Cutting in controlled layer counts | Cleaner edges, less distortion |
| Marking notches and centres | Accurate alignment at sewing |
| Separating defective areas of a roll | Fewer rejects after sewing |
| Cutting the handle length first | Longest pieces get the best material |
The handle is the longest single component on most totes, which is why it is normally cut before the body panels so it receives the cleanest length of material.
Handling large panels
A large panel distorts more easily than a small one during handling and sewing, particularly in softer PU leather. Trained operators handle panels with support rather than letting them hang.
Where a design allows, splitting a very large gusset into two or three pieces of the same material reduces distortion and can improve the finished appearance at a small increase in seams.
Handle Attachment: The Critical Detail
The handle is the tote’s only load-bearing feature. Everything the customer carries passes through two attachment points, and those points decide whether the product lasts.
Load concentration at two points
A tote holding five kilograms places that load on two anchor areas, each perhaps 4 by 8 centimetres. The pressure at the stitch line is therefore high, and it increases whenever the bag is lifted or swung.
Adding a reinforcement panel behind the anchor spreads the same load over a larger area of the body material, which lowers the stress per stitch and is the single most effective improvement available.
Common attachment methods
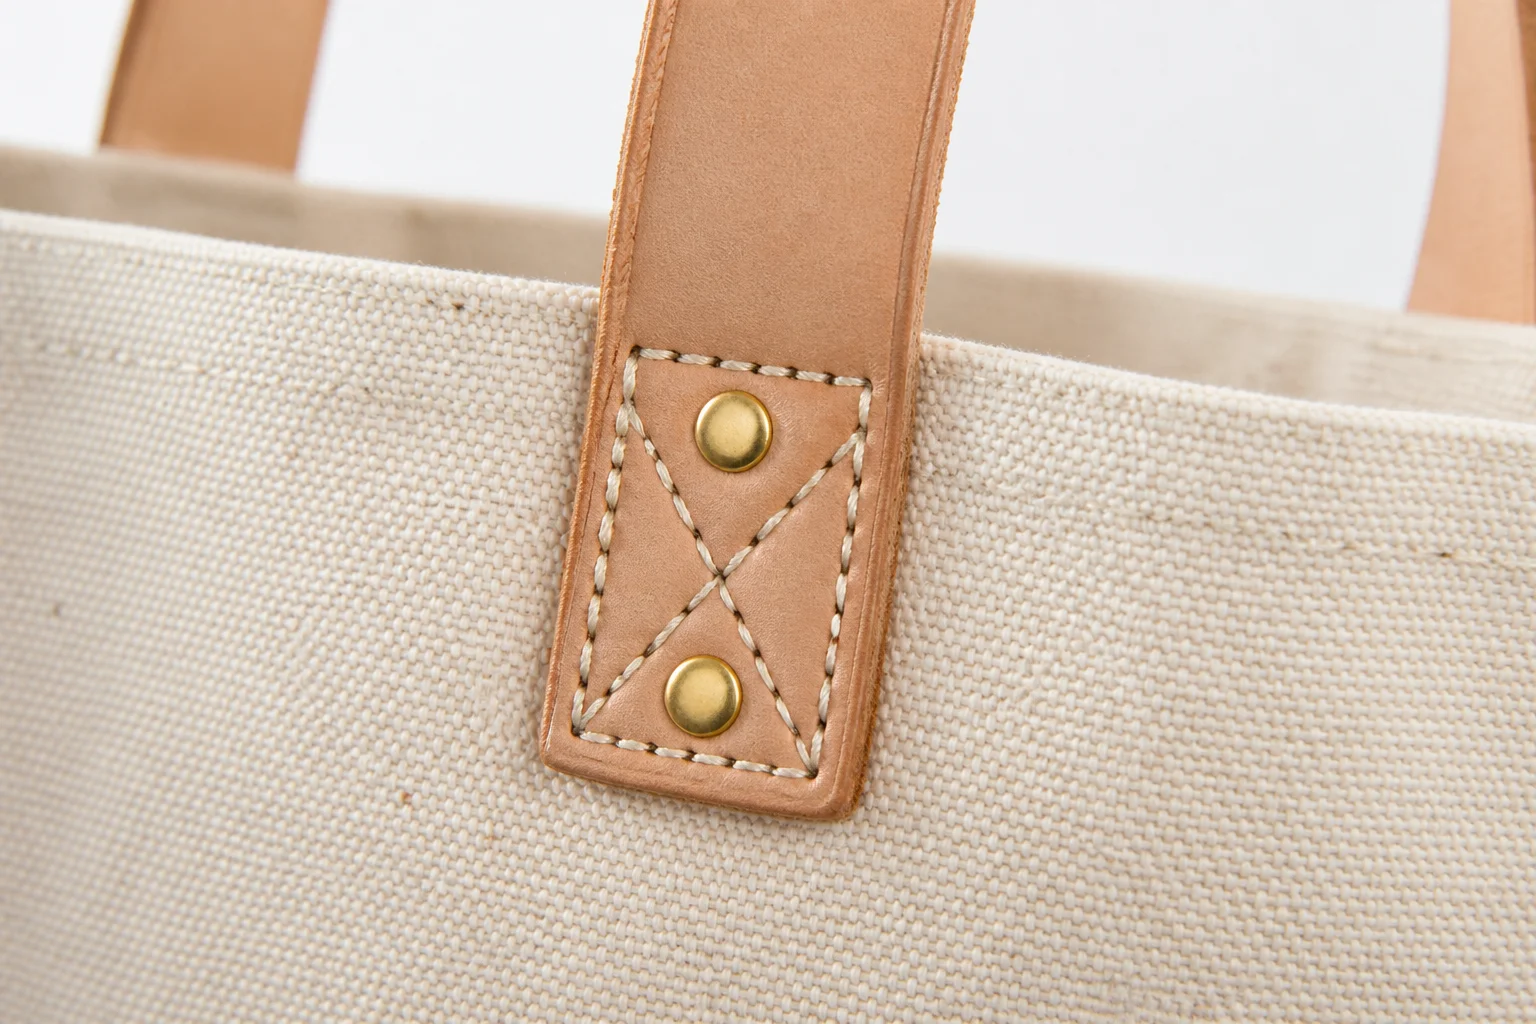
The handle can be stitched onto the outside of the body, inserted into the top seam so it disappears into the bag, or attached through a D-ring or metal plate. Each has a different strength profile and a different appearance.
Inserting the handle into the top seam gives the cleanest look and is strong when the top edge is reinforced, but it makes later repair difficult. An externally stitched handle with a visible reinforcement panel is easier to inspect and repair.
Attachment methods compared
| Method | Strength | Appearance | Repairability |
|---|---|---|---|
| Stitched to outside with patch | High | Visible reinforcement | Good |
| Inserted into top seam | High when reinforced | Cleanest | Poor |
| Stitched with no reinforcement | Low | Clean | Moderate |
| Riveted through the body | High on firm material | Hardware feature | Good |
| Metal plate and screws | High | Design feature | Excellent |
| Ring and loop | High | Adds hardware | Excellent |
| Box-and-cross stitch only | Moderate–high | Decorative detail | Moderate |
Where a brand wants a clean look without sacrificing strength, the inserted handle combined with internal reinforcement and box-and-cross stitching gives the best balance.
Stitching pattern and length
The length over which the handle is attached matters as much as the pattern. A short attachment concentrates stress; a longer one spreads it along the body panel.
Box-and-cross stitching is standard at these points because it combines a perimeter stitch with diagonal reinforcement, providing strength in several directions at once.
Handle construction itself
| Handle type | Construction | Best for |
|---|---|---|
| Flat folded | Single strip, edges folded and stitched | Economical, crisp look |
| Double layer | Two plies bonded or stitched | Heavier loads |
| Rolled | Material wrapped around a core | Comfort under load |
| Padded | Foam inserted before closing | Carrying heavier contents |
| Webbing | Woven strap, heat-sealed ends | Functional styles |
| Leather | Solid strip, burnished edges | Premium styles |
| Chain or cord | Attached through rings | Fashion, light loads |
A rolled or padded handle makes a measurable difference once the bag carries more than a few kilograms, and it is one of the first upgrades customers notice.
Handle length and drop
Handle length determines whether the bag can be carried on the shoulder or only in the hand. This is a specification decision that should be made from a sample, not from a drawing.
Because a slightly longer handle changes the bag’s proportions and its material consumption, the decision is worth finalising before production rather than after the first shipment.
Stiffening and Structure
A tote with no structure looks acceptable on a shelf and disappointing in use. Stiffening is what keeps the bag standing, protects the contents and holds the shape the designer intended.
Why structure matters on an open bag
An open bag has nothing holding its sides apart, so without interlining the sides collapse inward and the base sags under load. Both effects make the bag feel cheaper than it is.
Structure also protects the contents: a laptop or a document folder in a collapsing tote bends and creases, which is a complaint the brand receives rather than the factory.
Interlining options
Non-woven interlining is the most common choice, fused or sewn to the back of the panel. Foam gives a softer body with more thickness, and rigid boards are used for the base where load bearing is required.
Fusible interlining is applied with heat and pressure, so its bond quality depends on the material’s heat tolerance. On heat-sensitive PU leather, a sew-in interlining is the safer choice.
Interlining and stiffener options
| Option | Effect | Notes |
|---|---|---|
| Non-woven fusible | Light body, crisp surface | Needs heat tolerance |
| Non-woven sew-in | Light body, safer on PU | Extra sewing step |
| Foam sheet | Soft structure with thickness | Adds bulk and weight |
| Rigid board | Firm base and front | Base or structured styles |
| Combination | Foam plus board | Premium structured totes |
The choice is driven by the intended look: soft and slouchy, or firm and upright. Both are valid, and mixing them unintentionally is what produces a bag that looks neither.
Turning the bag and lining fit
On a lined tote, the bag is assembled inside out and turned through an opening. The lining must be cut slightly smaller than the outer body so that it sits inside without bagging once turned.
If the lining is cut to the same size as the outer, it will ripple and show through at the top edge. The correct allowance is a small reduction, specified in the pattern rather than left to the operator.
Where structure shows in the finished bag
Structure shows at the top edge, which should be firm and straight; at the base, which should not sag when the bag is lifted; and at the sides, which should stand when the bag is empty.
A quick check on the approved sample — stand it empty on a table and look at the top edge — reveals more about the structure than any specification sheet.
Closures, Pockets and Interior
The tote’s interior is where a basic product becomes a usable one, and it is also where design decisions have the largest effect on labour cost.
Choosing a closure
An open top offers the fastest access and the lowest cost. A magnetic snap adds security without complexity. A zip provides full closure and turns the tote into a commuter bag, at the cost of additional construction.
The closure decision affects both the pattern and the lining construction, so it must be settled before sampling rather than treated as a detail to add later.
Interior pockets
Most totes benefit from at least one slip pocket, and many add a zip pocket for valuables. A slip pocket is a simple panel sewn to the lining; a zip pocket requires a prepared zip opening and more careful alignment.
Pockets should be sized to real contents. A pocket that fits no common device, phone or wallet adds cost without adding utility, which is a frequent outcome when pockets are specified without reference to what will go in them.
Interior features and cost
| Feature | Construction impact | Value to customer |
|---|---|---|
| No closure | Simplest, fastest | Quick access |
| Magnetic snap | One setting operation | Light security |
| Zip closure | Zip prep, aligned opening | Full closure |
| Slip pocket | One panel, one operation | Organisation |
| Zip pocket | Prepared opening, more steps | Secure storage |
| Divider panel | Additional panel and seams | Structure and separation |
| Key leash | Small strap and hardware | Practical convenience |
| Bottle pocket | Elasticated or shaped panel | Everyday utility |
Two well-sized pockets usually add more perceived value than five poorly considered ones, and they cost considerably less.
Lining material and colour
Lining material affects how the interior feels and how it wears. Polyester taffeta is economical and smooth; a slightly heavier woven lining resists tearing at the pocket mouths.
Colour choice is a merchandising decision: a light lining makes contents easy to find, while a dark lining hides marks. Both are legitimate, and the choice should be consistent across a range.
Attaching the lining
The lining is normally joined to the outer at the top edge, then turned, leaving a clean top line with no visible seam. Where a zip closure is used, the lining is attached around the zip opening instead.
At the join, the lining must sit slightly below the top edge of the outer so that it never shows on the outside. This is a small allowance that separates a professional finish from an amateur one.
Edge Finishing and Topstitching
Edges and stitch lines are the most legible quality signals on a tote, because they are long, uninterrupted and directly in view.
Why topstitching is judged so harshly
A single wavering line across a 35 centimetre top edge is instantly visible, and it reads as low quality regardless of the material used. Consistency here matters more than on any other bag type.
Guidance features — a marked stitch line, an edge guide on the machine or a template — are what keep the line straight across a production run.
Edge treatment options
Raw cut edges are the least durable and the least finished. Folding the edge under and stitching it hides the cut; binding with a separate strip gives a strong, decorative finish; edge paint seals and colours the cut on PU and leather.
On a tote with a visible open top, the edge treatment is one of the first things a customer touches, which makes it a poor place to economise.
Edge options compared
| Treatment | Durability | Appearance | Application |
|---|---|---|---|
| Raw edge | Low | Unfinished | Hidden interior only |
| Folded and stitched | Good | Clean, standard | Most totes |
| Bound or piped | Very good | Decorative, strong | Premium, contrast designs |
| Edge painted | Good | Refined, colour matched | PU leather and leather |
| Heat sealed | Good on synthetics | Clean on webbing | Webbing handles |
Mixing treatments within one bag is normal — painted on the handles, folded on the top edge, bound on interior pockets — provided each is applied deliberately.
Stitch length and thread
Stitch length affects both appearance and strength. A moderate stitch length reads as quality; a very long stitch looks sparse and a very short one can perforate softer materials.
Thread size and colour also matter: thread matched to the material looks integrated, while a contrasting thread becomes a design feature that must be perfectly even.
Interior finishing
Inside the bag, seam allowances are usually pressed and may be bound or overlocked. An unbound seam on a visible lining shows raw edges that shed fibres over time.
On an unlined tote, the interior seams are fully visible, which makes folded or bound seams a requirement rather than a refinement.
Lining and Reversible Construction
Lining decisions affect structure, cost and how the bag feels in daily use, and the available options run from no lining at all to fully reversible construction.
Unlined totes
An unlined tote relies on the body material alone, so its interior seams must be finished properly. PU leather with a clean backing can work well and keeps the bag light and inexpensive.
An unlined tote in a single layer of thin material will stretch and show its contents as bulges, which is why unlined constructions usually suit firmer or heavier materials.
Lined totes
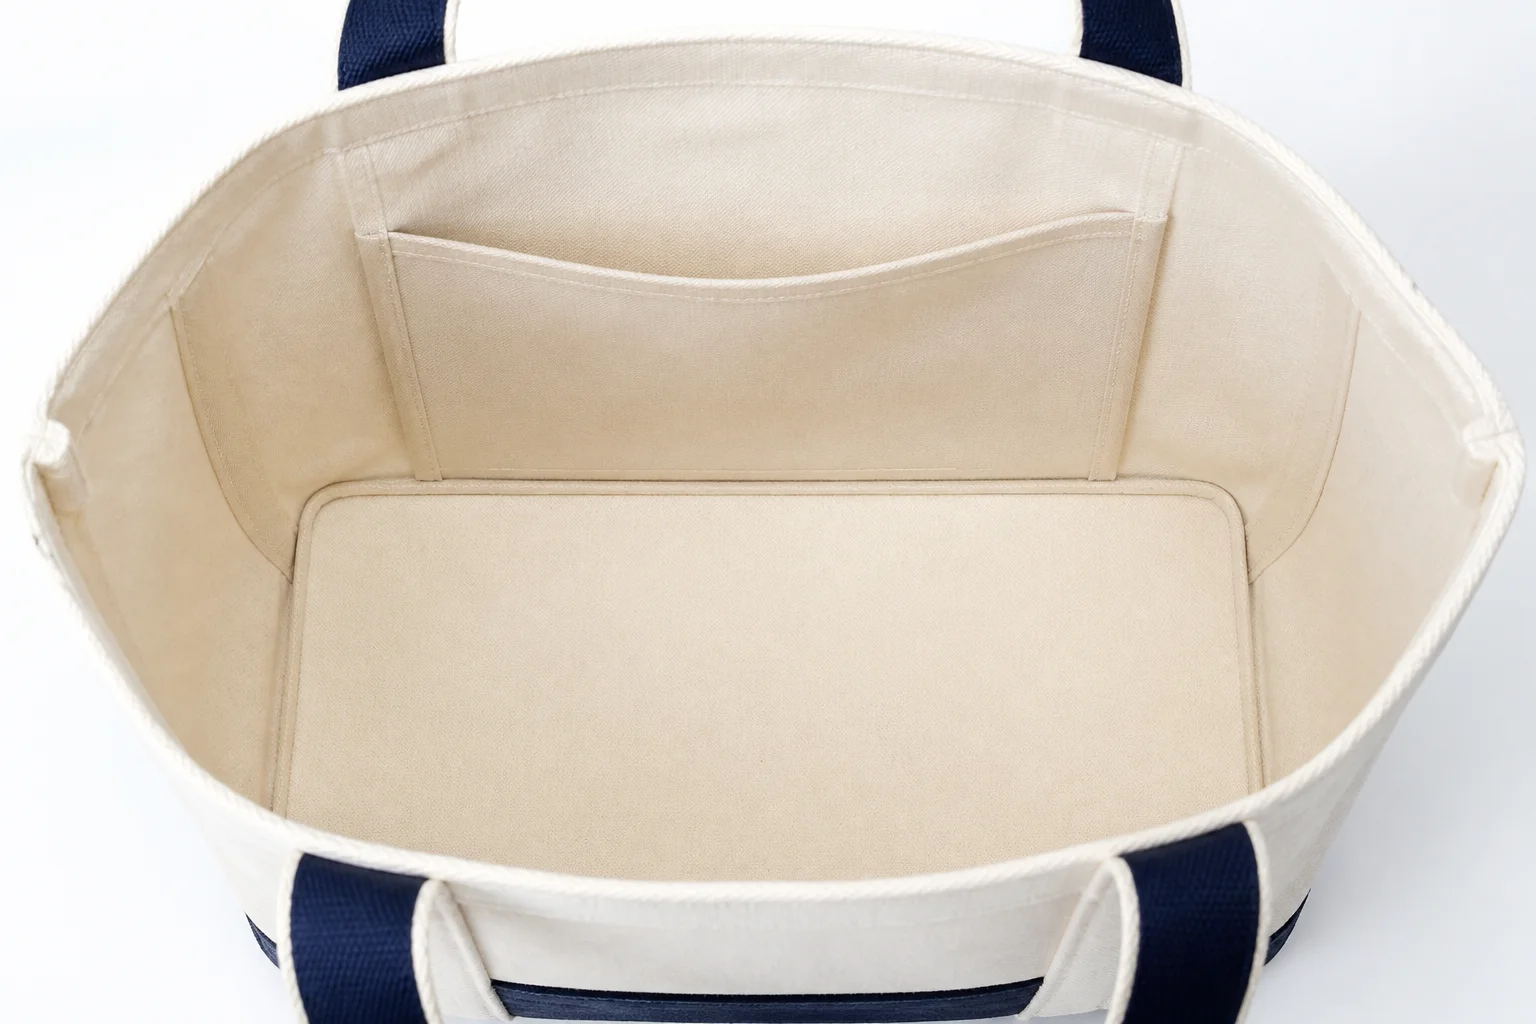
Lining hides the construction, adds a clean interior and improves the bag’s ability to hold shape. It also adds the most steps of any single feature, so its cost should be understood before it is assumed.
A lined tote can be assembled in two ways: with the lining joined at the top edge and turned through an opening, or with the lining inserted and top-stitched in place. The first gives a cleaner top line; the second is faster and leaves a visible stitch line inside.
Construction approaches compared
| Approach | Interior look | Labour | Notes |
|---|---|---|---|
| Unlined, finished seams | Visible construction | Low–medium | Suits firm materials |
| Lined, turned through opening | Clean, enclosed | High | Best top edge |
| Lined, top-stitched in place | Visible stitch line | Medium | Faster, less refined |
| Separate insert bag | Clean, removable | High | Adds a usable product |
| Reversible | Finished both sides | Very high | Two looks in one |
Reversible construction doubles the finishing work and requires both faces to be presentable, which is why it appears mainly in premium and travel-oriented products.
Lining attachment and movement
An unattached lining can shift inside the bag, which looks untidy and eventually wears through at the points where it rubs. Tacking the lining to the seam allowances at the base keeps it in position.
Where a lining is attached too tightly, however, it restricts the bag and pulls at the top edge. The right amount of slack is a pattern decision that should be confirmed on the sample.
Lining durability
Lining failures appear at the pocket mouths, the top edge and the base corners. Choosing a slightly heavier lining and binding the pocket edges removes most of these failures before they occur.
Base and Corner Reinforcement
The base of a tote contacts every surface it is placed on, and the corners carry the entire load of the contents. Both areas deserve more attention than their visible size suggests.
Base construction
A base panel is usually the same material as the body with an internal board or stiffener. The board distributes the weight of the contents so the bag sits flat rather than sagging into a point.
Where the base board is removable, it should be held in place by a pocket or base seam so it does not shift. A loose board inside a bag is a common and easily avoided annoyance.
Corner reinforcement
The bottom corners are where the material is folded, stressed and rubbed most. Reinforcement here can be as simple as an extra layer of the same material, or as visible as a contrasting corner panel.
Metal or plastic feet lift the base off the ground and reduce abrasion, and they also protect the material from wet surfaces. Their cost is modest and their effect on durability is disproportionate.
Base and corner options
| Option | Effect | Cost level |
|---|---|---|
| Bare base | Wears quickly, may sag | Lowest |
| Internal base board | Flat, load distributing | Low |
| Reinforced base panel | Abrasion resistance | Low–medium |
| Corner reinforcement patches | Wear resistance at corners | Low |
| Metal or plastic feet | Lifts base, protects material | Medium |
| Base with protective strip | Adds durability and design | Medium |
For most totes, an internal base board plus corner reinforcement covers the two failure modes at a cost that is barely visible in the overall price.
Handling the corner seam
Where the base meets the sides, the material must turn a corner, which is where distortion and puckering appear. Trimming and notching the seam allowance at that point allows the corner to lie flat.
Poorly handled corners are one of the clearest signs of an inexperienced maker, because they are difficult to correct after assembly.
Common Defects and Quality Control
Because a tote has nowhere to hide a fault, quality control on this product is largely a matter of checking the features the customer will look at first.
The first four things a customer inspects
The top edge, the handles, the base and the interior. Each corresponds to a construction decision, and each should be included in a documented inspection routine.
An inspection that covers dimensions, symmetry, stitch quality at the anchors, handle length consistency, lining fit and closure function will catch the overwhelming majority of field complaints.
Tote inspection checklist
| Check | Method |
|---|---|
| Overall dimensions | Measure against specification |
| Top edge straightness | Lay flat and compare to a rule |
| Handle length and position | Measure both handles, check symmetry |
| Handle attachment | Inspect stitching, reinforcement, pull test per plan |
| Base rigidity | Stand the bag and check for sag |
| Corner finish | Check for puckering and wear layers |
| Lining fit | Check no bagging, no show-through at top |
| Pocket position and size | Measure against specification |
| Closure function | Operate the zip or snap repeatedly |
| Colour consistency | Compare panels under consistent lighting |
| Cleanliness | No marks, adhesive residue or loose threads |
| Labelling and branding | Position, content, alignment |
Running this list on the pre-production sample and again at final inspection keeps the delivered product aligned with what the buyer approved.
Defects that only appear after use
Some faults cannot be seen at inspection: lining that rubs through, interlining that separates, thread that abrades at the anchor or edge paint that cracks at a flex point.
These are addressed through material selection and testing rather than inspection. A short cyclic test on the loaded sample reveals most of them before production starts.
Documenting the approved sample
Sealing the approved sample, photographing it from all angles and recording its measurements protects both parties. Disputes about colour, dimensions or finish are resolved by comparing against that reference.
A tote is the easiest bag to sell and the hardest to hide in. Every millimetre of its top edge is a quality claim the customer can check.
Cost Drivers and Yield
Understanding where a tote’s cost sits allows a brand to spend money where customers notice and save it where they do not.
The four cost components
Material consumption, labour operations, trim and hardware, and finishing. On a tote, labour and material are the two dominant components, and their balance shifts with the design.
A large unstructured tote is material-heavy and labour-light. A small structured tote with a lining, pockets and hardware is the reverse, even though it uses less material.
Where saving is invisible and where it shows
| Decision | Savings | Visible to customer |
|---|---|---|
| Reduce panel dimensions slightly | Material yield | Little, if proportions kept |
| Simplify the base reinforcement | Small material and labour | Yes, when loaded |
| Use unlined construction | Significant labour | Yes, on interior |
| Lighter interlining | Small material | Yes, shape loss |
| Shorter handle attachment | Small labour | Yes, when it fails |
| Narrower handle | Material | Yes, comfort |
| Single pocket instead of two | Small labour | Moderate |
| Simpler edge treatment | Labour | Yes, on top edge |
The pattern is clear: the savings that show are almost all in the areas the customer touches. Savings in panel dimensions, interlining placement and pattern efficiency are largely invisible, which makes them the better targets.
Ordering quantity and price breaks
Totals costs fall with quantity because cutting, setup and some handling are shared across the run. The largest price breaks usually appear between sampling and the first bulk order, and again when quantity supports a dedicated line.
Requesting quotations at two or three quantities shows where the meaningful thresholds sit, which allows a brand to choose an order size deliberately.
Sampling costs and their purpose
The sample is where the handle position, lining fit, edge treatment and structure are verified. Spending time at that stage is considerably cheaper than correcting a feature after bulk production.
Where a brand is developing a range, approving one sample thoroughly and reusing its specification across related styles reduces both sampling cost and risk.
Retail Presentation and Packing
A tote arrives with a silhouette already decided, and how it is packed determines whether that silhouette survives the journey.
Holding the shape in transit
An unpadded open tote collapses into a soft shape in the carton, and creases form along the top edge and handle. Filling the body with paper keeps the panels flat and the top edge straight.
Where the tote has interlining or a base board, it resists packing pressure better and generally needs less filling, which is one of the practical benefits of structure.
Protecting handles and surfaces
Handles are the components most likely to crush or mark during transport. Wrapping them or laying them flat against the panel avoids both crushing and the pressure marks that can be permanent on coated material.
Contact between metal hardware and coated surfaces also transfers marks, so separating bags or wrapping hardware is worth the small additional cost.
Retail and e-commerce presentation
| Element | Purpose |
|---|---|
| Shape retention | Product photographs match the intended design |
| Care card | Usage and cleaning guidance |
| Dust bag or wrap | Protection and unboxing experience |
| Price or product tagging | Required by most retailers |
| Carton marking | Correct handling in the warehouse |
| Consistent folding | Uniform retail appearance across a run |
Retailer requirements for carton dimensions, labels and barcodes are usually fixed in advance, so collecting them before production avoids reworking packaging later.
Photographing totes for e-commerce
A tote photographs best when it is holding its intended shape, and that requires structure or filling. A soft, collapsed tote photographs as a shapeless bag regardless of how well it is made.
This is a useful reminder that the structural decisions discussed earlier affect not only use but also how the product sells online.
FAQ
Why is a tote harder to make than it looks?
Because it has large flat surfaces and an open top with nowhere to conceal faults. Panel distortion, uneven top edges and handle misalignment are all immediately visible.
What is the strongest way to attach a tote handle?
Anchoring the handle with an internal reinforcement panel, box-and-cross stitching and a longer attachment length spreads the load best. Metal plates or rings are also strong and are easier to repair.
Does a tote need a lined interior?
A lining improves the interior appearance, hides construction and helps the bag hold shape. It also adds the biggest single labour step, so unlined construction suits firm materials and lower price points.
How do I stop a tote from sagging when loaded?
Add an internal base board and sufficient interlining in the panels. Both distribute load and hold the base flat, which is what prevents the bag from collapsing into a point.
What interlining should be used on PU leather totes?
A sew-in interlining avoids heat exposure, which matters on heat-sensitive PU. Fusible interlining is workable where the material tolerates heat and the bond can be verified on the sample.
How wide should a tote handle be?
Around 25 to 40 mm suits heavier loads comfortably. Narrower handles reduce material use and suit light loads, but will dig into the hand once the bag is full.
Should the lining be the same size as the outer body?
No. The lining should be cut slightly smaller so it sits inside without bagging once the bag is turned. The exact allowance belongs in the pattern.
How do I keep topstitching straight across a production run?
Use a marked stitch line, an edge guide or a template rather than relying on operator judgement, and check the top edge of a sample from each batch.
Which edge treatment is best for a tote’s top edge?
Folded and stitched is the practical standard. Bound or piped edges are more durable and decorative, while edge paint suits PU leather and leather where a refined finish is wanted.
Are metal feet worth adding to a tote?
They are, for styles with a rigid base that will be set down frequently. Feet lift the base off abrasive and wet surfaces and protect the material at the point of contact.
How many interior pockets should a tote have?
Two well-sized pockets — one slip, one zip — cover most needs without adding cost or clutter. Size them to real contents rather than to a visual idea of organisation.
What should a tote sample verify before bulk production?
Handle position and drop length, top edge straightness, structure when empty, lining fit, edge treatment and closure function. These are the features a customer notices first.
Next Steps: Specify the Details Before the Shape
The tote’s shape is easy, and the details decide the outcome: the handle anchor, the structure, the top edge and the lining fit. Specifying those four things turns a simple silhouette into a product that survives daily use.
Send us your tote design and intended use, and we will propose the panel construction, reinforcement, handle attachment and lining approach for that specific brief.
Developing a tote range and want the hidden details specified properly? Contact our team at info@gionar.com and we will prepare the construction specification for your styles.
Related reading: our custom bag manufacturing portfolio shows the tote constructions and handle details we produce.